Last Updated on January 10, 2026 by Taylor
Adding an announcement bar on your website is a perfect way to share news with your website visitors and increase your sales.
It’s easy to add, and if you just need something basic, it’s totally free!
What is an announcement bar (or action bar)?
Basically, an announcement bar is a small bar along the top or bottom of your site with text, a button (with a link), and sometimes a thumbnail image.
It’s a way to distill important information into an area that can’t be missed, even with all the potential distractions of your website. Most importantly, it encourages your website visitors to take a specific action.
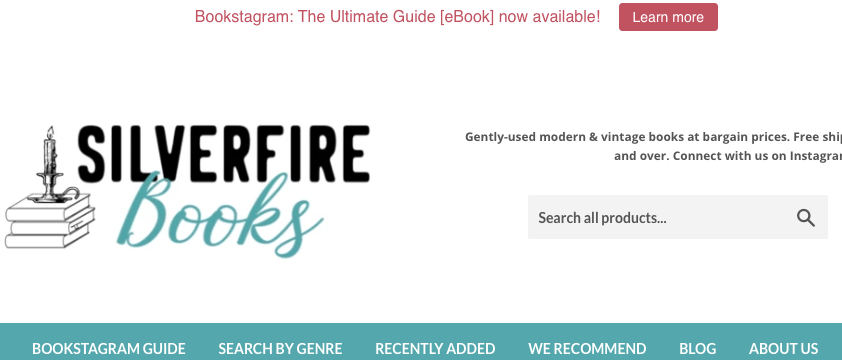
For example, I’ve used an announcement bar on my online shop’s website (previously named SilverFire Books, now Reader Haven) to let visitors know when my new eBook was available.
You can also use an announcement bar to grow your email list. Let your visitors know about an enticing freebie you’ve created, and link to a landing page with your opt-in form so they can find it easily.
Announcement bars can directly increase your sales by tempting visitors with a current sale, such as a temporary 20% off discount, a free shipping coupon, a 2-for-1 sale, or a free gift with purchase.
And just like with my eBook, you can announce a new product. Or, just show off your most popular product!
So, how the heck do you add this awesome bar to your site?
Please note, some links on this page are affiliate links. If you make a purchase through an affiliate link, I may receive a small commission at no additional cost to you. As an Amazon Associate, I earn from qualifying purchases. See my full disclosure policy for more information. Thank you for your support!
How to Add an Announcement Bar to a WordPress Site
There are a couple free apps you can download for your WordPress site that allow you to add an announcement bar.
WPFront Notification Bar is your best bet for adding a bar with a clickable button to a URL. You can even edit the animation and timing of the bar, and change the colors to fit your site’s theme.
It’s free, and has all the basic features you should need. If you want a countdown clock or video overlay, though, you’ll need to upgrade to the premium version.
I’ve also used Icegram in the past, and it’s pretty easy to use. You can create an action bar with a notification, but I believe adding a link is a premium (paid) feature.
How to Add an Announcement Bar to a Shopify Site
On my previous Shopify site, I used the Quick Announcement Bar by Hextom.
At the time I’m writing this, it’s free, and it has all the basic features you should need to link to a product/page, announce a current sale, or link to a landing page so visitors can sign up for your email list.
All you need to do is choose a template, enter your message and button URL, and decide where you want the bar to appear. You can also edit your font, font color, and button color to match your theme.
Additionally, you can choose where you want to message to appear, and how you want it to display.
It took me about 5 minutes to set up. It’s that simple!
You can get a free trial to Shopify here. (I used it for years for my online bookshop before I transitioned my business, and I loved it! It’s so easy to use.)
Tips for Creating an Announcement Bar that Converts
When building your announcement bar, there are a few factors you should keep in mind. You want to make sure it converts, without annoying your visitors.
1. Use colors that stand out but are complementary to your theme.
You don’t want your bar to clash with your theme, because it’ll look out of place. But you do want it to stand out enough to get noticed. See if you can find a complimentary or secondary color that’s used in your theme.
2. Fill the button with a color.
A colorful button stands out way more than a plain text link.
3. Add a call-to-action in the button/link.
Button text like ‘Learn More’ and ‘I Want In!’ can be really successful when it comes to conversions. Whichever phrase you use, make sure you’re prompting visitors to take an action.
4. Add a small thumbnail photo of your freebie or product.
This isn’t always possible with the free versions of announcement bar apps. But, if the app allows you to add an image or custom code, see if you can add a mockup or thumbnail image of your product or offering.
This draws the eye and piques a viewer’s interest.
5. Don’t overload the bar with text, but make the intent clear.
Try to use the least amount of words you can while still getting the necessary information across. Mention your freebie or product name, and maybe one sentence about its features or how it can help your audience.
There you have it: how to add an announcement bar on your website, so you can point visitors toward an important message or action.
Good luck building your own announcement bar. And don’t be afraid to get creative with it!
I’ve been looking for a workable Notification bar and WPfront has the best. Really good and helpful post, Taylor!
Regards.
Thank you 🙂 Yes! I’ve found it to be super useful, especially with a new product release. Happy to hear you found the article helpful!